
God Bless America!
N1NKM's

Ribbon mic pg 1 of 4 |
 |

HOMEBREW ribbon microphones!
Jump to construction tips at bottom of this page...
There's also a nifty little "matching" headphone amplifier HERE.
Latest updates: 1/6/07
Beta unit modified. Preamps on all new units have been upgraded with low-noise transistors & a few other component changes/additions. See Delta Unit page for details on Preamp V3.0
This is PAGE 1 OF 4:
ALPHA UNIT (This page.)
BETA UNIT (Page 2) (BETTER)
GAMMA UNIT (Page 3) (BETTER YET)
DELTA UNIT (Page 4) (BEST)
UPDATES:
7/12/07
Alpha Unit has been disassembled. 4'th unit built.
The Alpha's transformer was used in the DELTA UNIT.
1/1/2007
A third unit was constructed and used on-air. (Gamma Unit)
Reports are that it sounds BETTER than my D-104!
It sounds quite good in the headphones, too!
| PROTOTYPE homebrew Ribbon Microphone, 1-hour, temporary lashup |
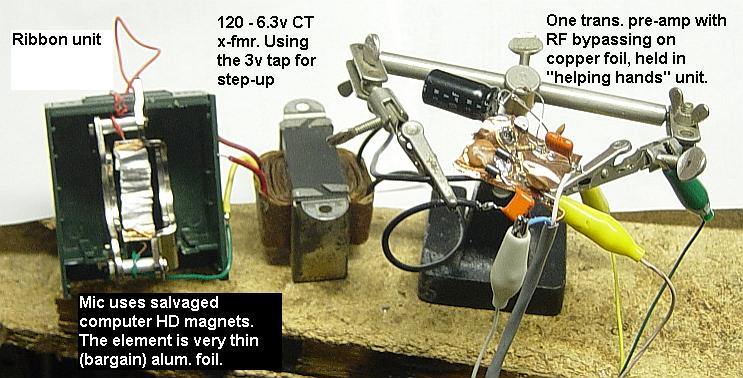 |
I built this whole thing, totally FROM SCRATCH, in just ONE HOUR! Believe it or not, this ridiculous contraption ACTUALLY WORKED!! I put it on the air on 3879Khz AM on 11/24/06 around 11:45am EST and had a QSO with it! It sounded tinny- but it WORKED! A little tweaking, RF shielding, mounting into a proper enclosure, and MUCH MORE tweaking should cure those problems. Cutting a hole in the plastic box behind the ribbon should help with the accoustics. (It did, but not by much.)
The version 1.0 preamp was very similar to my 1-transistor D-104 preamp which can be seen HERE. (See 2.0 schematic, below.) Using a piece of copper foil as a base, I used the "ugly construction" method. It's pretty decent at rejecting RF, too! The fact that I was able to do this project, start-to-finish in just one hour blows my mind. :) When I heard Stu, AB2EZ on the air with HIS homebrew ribbon mic, I was INSPIRED! That is a "dangerous" thing! Hihi! :) You can see the result, here, and several others HEARD it, too! Once the proof-of-concept had been made, it was time to REFINE this puppy, make it sound good, and put it on the air in a more permanent encosure! :) That happened later, as linked above.
Note: Link added to Stu's site on 12/21/2006.
(Updated on 5/21/16, when the original link was found to be broken. Thank you WAYBACK machine!)
That was the first time I had actually seen his microphone. (I have only HEARD it up to this point.) Although he did describe it on the air, pictures are worth 1,000 words! Now that I've seen it, I can see that he has some excellent ideas! (I'm INSPIRED again... imitation is the highest form of flattery.)
The Alpha Unit is just a small plastic box to hold the magnet & ribbon structure. The magnets, which were salvaged from a dead hard drive, are held apart by some aluminum spacers & 4-40 screws, all purchased at Radio Shack. The ribbon is nothing more than a 5/16 or so wide strip of very thin aluminum foil. Look for the cheapest "generic" aluminum foil on the store shelf- not Reynold's, it is too thick. You want the cheapest, flimsiest stuff they have- in this application, the flimsier, the better! ;) I folded it back and forth, like a pleated shade, to give it rough corrugations. In the original slap-dash lashup, a filament transformer "in reverse" used the 3v half winding as the primary, and the 120v side fed the pre-amp. The alligator clips you see are the PTT and power supply connections.
To connect to, and support the ribbon, I used some of that copper foil, cut to strips the same width as the ribbon. They are about an inch long. The ribbon foil is about 5". (NONE of this is critcial!) I folded the copper foil in half, then slid that over each end of the ribbon. Folding that back & forth, then applying some solder to the ends "locks" the ribbon in place, and ensures a good, very low-Z connection. (The impedance of this thing is probably in the MILLIOHMS!) The ribbon was "corrugated" after these terminals were attached, simply by zig-zag folding it, then gently stretching it back out. 20 guage wires are all it needs to hold it between the magnets (about 1/2" apart) and it even took on a C-shaped curve, which matches the magnets nicely.
If I can get it mounted into a better enclosure and improve the frequency response, I may well start using it regularly for AM when condx are good. Poor condx, I'll switch back to the more midrangey D-104 system for it's improved intelligibility.
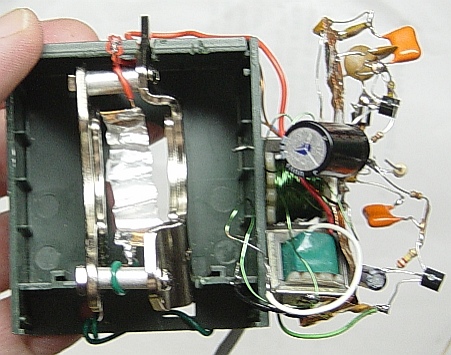
This is the Alpha Unit, Version 2.0
| My 1'st HOMEBREW Ribbon Microphone! (Version 2.0) |
 |
| (Alpha Unit Version 2.0, back view) |
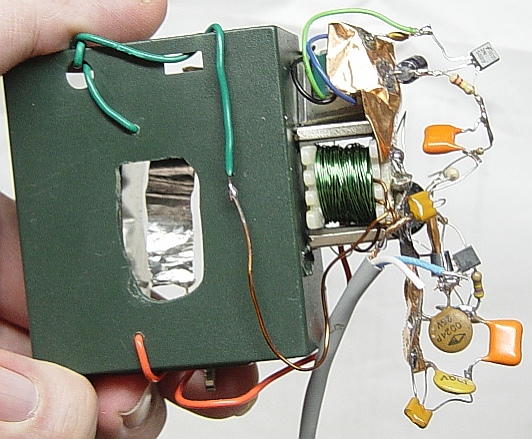 |
The first custom-wound transformer is clearly visible in this back view. It has a single-layer winding of 21 guage wire as the primary, and as many turns as possible of ~32 guage wire as the secondary. It gives me a 10:1 voltage step-up ratio. This transformer then feeds the 8 ohm side of a little 8-1K CT tranny, which is also about a 10:1 voltage step-up, for a total of approximately 100:1.
I've also attached the preamp directly to the frame of the custom-wound audio transformer, and added another stage. The first stage is common-base, feeding the original common-emitter stage. While this has a tad more gain than 1.0, we're still not there yet for frequency response & hum pickup. This project truly is a WORK IN PROGRESS!
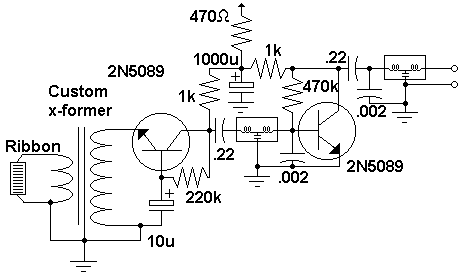
| Alpha unit V2.1 preamp schematic |
 |
UPDATE: 12/27/2006
The transformer pair has now been replaced by a new, custom-wound transformer. (The coil is wrapped in blue tape.) The output of this one is higher than the two transformers of the original. The prototype unit is now designated as the ALPHA unit, and is version 2.1. It is on the right in the pic, below. Click for a large view, use browser BACK button to return here. The schematic has been updated, accordingly. (One transformer instead of two.)
The small coil/cap/coil units are tiny RFI filter modules I got a few years ago from Mouser. They do a VERY good job of eliminating RFI.
UPDATE: 12/21/2006
Construction tips
Here's more information for those of you who would like to try your hand at building your own ribbon microphone! Remember, DO NOT expect the same results as professionally manufactured units, unless you actually have the equipment, materials, and SKILLS to make these things to professional standards. MOST of us do NOT! ;)
Here is a little info about the magnets that are available, but first, some words of WARNING:
If you order modern neodymium magnets, BEWARE, because they are EXTREMELY powerful! If they snap together too hard, they can SHATTER into millions of needle-like shards, some of which can cause severe injury or blindness! These magnets also can very easily pinch your skin with enough force to make painful "blood blisters". Most manufacturers of these magnets include these kinds of warnings. Heed them.
| Magnet pole orientations |
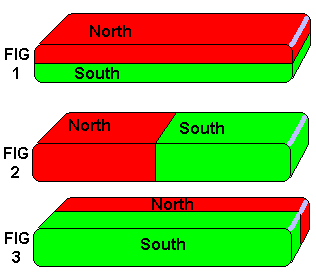 |
Figure 1, above, would be ideal, as the magnetic surfaces are uniform. You can order magnets like this. This is commonly referred to as "Through the thickness" or "Parallel to thickness".
Figure 2 illustrates the type I used in these homebrew units. They were all salvaged from "dead" computer hard drives. This is commonly referred to as "Through the length". Or "Parallel to length". I make them work by positioning the ribbon over only one end. If the ribbon runs the whole length, you will tend to have reverse polarity voltages, which would partially cancel, making the mic have low output and sound strange.
Figure 3 is known as "Through the width" or "Parallel to width". It is shown simply to illustrate the three most common types of pole orientations available. There are also magnets with multiple poles. (alternating N/S/N/S...) Those colorful, rubber "fridge magnets" often use this multi-pole design for better grip. They would be totally useless in this application!
The magnets used in the Gamma unit more closely resemble figure 1.
You want the magets to have opposite poles facing together, so they will need to be mounted into and onto a sturdy support. They should be spaced about .5" apart. You want the ribbon to be close to .3", which leaves about .1" clearance on either side between the edges of the ribbon and the magnets, themselves. These dimensions are not that critical, if all you're looking for is reasonable function.
Below is how I make all of my ribbons. The grey is thin aluminum foil. The "copper" color is copper foil.
| Ribbon construction |
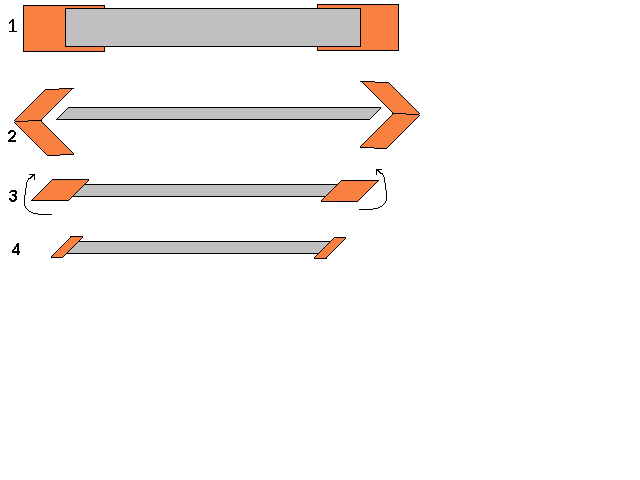 |
Fig 1 shows the approximate, relative sizes of the aluminum & copper strips I use.
Fig 2 shows bending the copper foil into halves, overlapping the aluminum foil, the ends of which go right into the crease of the copper.
Fig 3 illustrates folding the copper flat onto the aluminum, then bending it in half again. Do this twice.
Fig 4 shows the nearly complete ribbon. the excess copper can be trimmed from the sides, so that it is the same total width as the aluminum. A bit of solder applied to each side will "lock" the copper into its folded form, and prevent the aluminum from coming loose. It also makes an excellent means to solder stiff wires to the ribbon. Before you do this, you should put some slight corrugations into the foil. I found that fewer, shallower folds work much better than many sharp folds. 14 guage wire (standard house wiring) makes excellent supports, as shown here.
| Ribbon support |
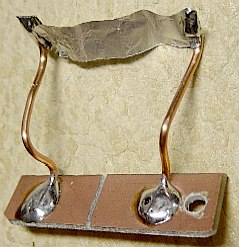 |
If you custom-wind a transformer, use 15 to 20 turns of this on the primary, then as many turns as will fit onto the secondary. Leave enough of the primary's wire sticking out of the tranny to connect to the support for the ribbon. It's really up to your imagination how you may want to proceed. EXPERIMENT! :)
BTW, there is a drawback to having the tranny mounted in such close proximity to the magnets- it is very sensitive to vibration. (But then, so is the ribbon, itself, so it matters little.) You'll probably want to use some kind of "shock mount" like rubber bands or springs to hold the ribbon unit. Putting it into a stand is good, because you really don't want to hold it. (It's VERY sensitive to even the smallest movements.)
A note about the foil- I tried using some super-thin stuff, and it did not work that well. The very cheap store-bought "generic" brands of aluminum foil seem to be about the right thickness for this.
Others in this series:
BETA UNIT (Page 2)
GAMMA UNIT (Page 3)
DELTA UNIT (Page 4) *This is the BEST one!*
Take me HOME...